Official Manual / Home → Global Routing → Connectivity Test
Shadowrocket Setup Guide
Import a subscription, choose a mode, and make your first connection. Follow these five steps for a basic check before troubleshooting rules or network differences.
Keep the original settings and verify one connection first. Avoid changing the server, mode, and Config at the same time; otherwise, it will be hard to tell which change affected the result.
01 / Add Server · Subscribe
Add a Server or Import a Subscription
First, check whether you have a subscription link or individual server details. Use either method; there's no need to add the same connection twice.
Import with Subscribe
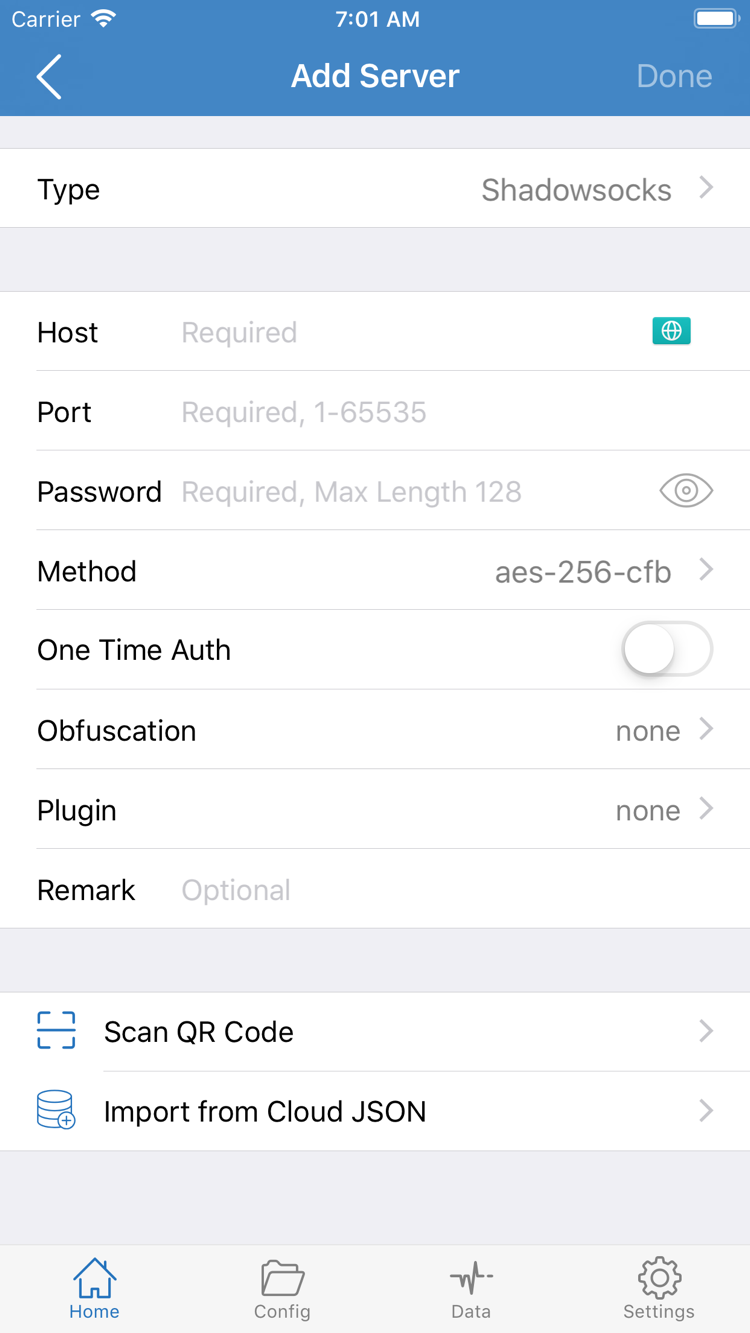
Open Shadowrocket, go to Home, and tap Add Server. On the Add screen, tap Type, choose Subscribe, and return to the entry form. Paste the complete subscription link from your service provider into the URL field. Check that the beginning, end, and query parameters are intact, then save. Don't enter the provider's information page URL by mistake, or include explanatory text, quotation marks, or line breaks when copying the link.
After saving, return to Home and wait for the subscription to load. The subscription group and its server entries should appear before the list is considered imported; a group name alone doesn't confirm that the import is complete. Expand the group, check for selectable entries, and choose one to test. For the initial check, keep track of the source and avoid importing the same link more than once.
If the list is empty, first confirm your device can access the internet, then check that the link is complete and still valid. Refreshing a subscription retrieves its source again; it can't restore expired service access. Contact your service provider to check the link's status. Repeatedly adding the same subscription won't fix it.
Enter Details Manually with Add Server
If you have individual details such as Host, Port, and authentication information, tap Add Server in Home, set Type to the protocol specified in your information, and fill in each field. Enter the server's domain or address under Host and the connection port under Port. The selected Type determines whether fields such as Password and Method appear. The official screenshot shows one set of fields, not a universal authentication method for every protocol.
Compare each field with the original details, paying particular attention to uppercase and lowercase characters in authentication values, port numbers, and accidental spaces at either end. For TLS, transport settings, and other optional fields, use the details you were given rather than guessing from the protocol name. If a field is unclear, check the glossary. For how protocol parameters relate, see the protocol guide. This page covers only the checks needed for your first connection.
If you have the corresponding QR code, use Scan QR Code in Add Server. Import from Cloud JSON is for files in the relevant format, not a general-purpose subscription field. After saving, return to Home and make sure the new entry appears and is selected. This only adds the details; it doesn't establish a connection. Next, choose Global Routing.
02 / Global Routing · Config
Choose Global Routing
The mode determines how connections are handled. Selecting a server doesn't mean every request will use it.
Understand the Three Modes
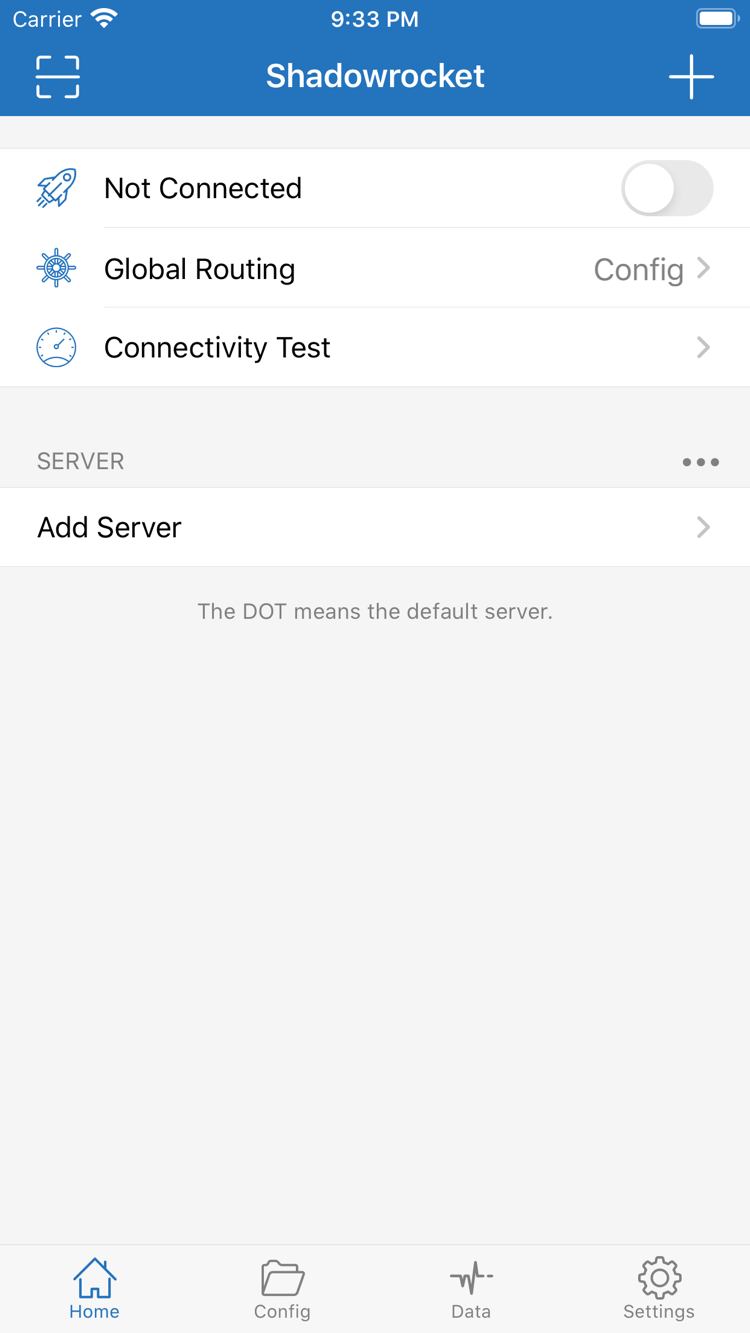
In Home, tap Global Routing and choose Config, Proxy, or Direct for your current task. Config applies the connection policies in the active configuration file and is suitable when you have routing rules in place. Proxy sends connections normally handled by this mode through the proxy route, which can help isolate rule-related issues. Direct connects to the destination without a proxy, so it isn't suitable for checking whether a proxy server works.
For a first server test, if you haven't confirmed the contents of Config, you can temporarily choose Proxy to check the server route first. After the test, switch back to Config if that's what you need. This is a way to narrow down the issue, not a recommendation to use Proxy for every situation. Note your original selection before and after testing so you don't mistake an unreverted setting for a broken rule.
Check the File Before Using Config
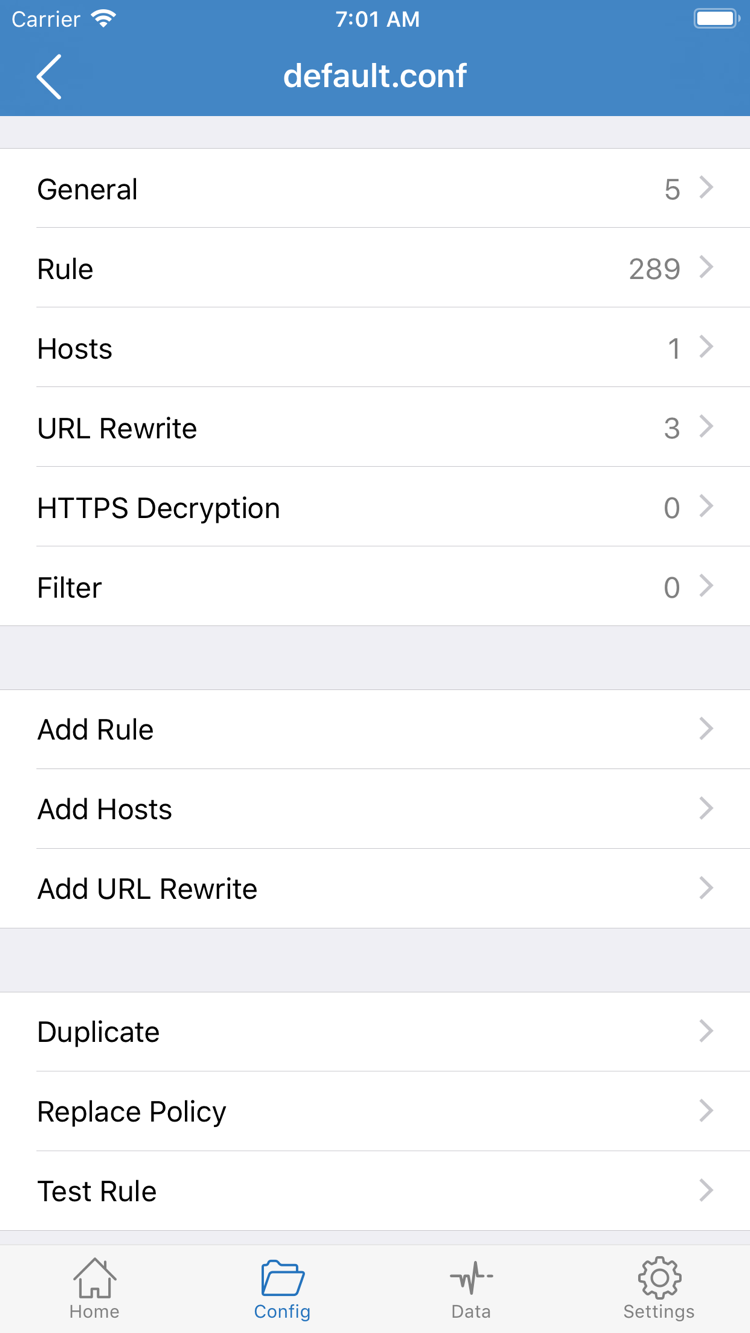
If you plan to use Config, open Config and check which file is currently active before viewing its contents. A subscription usually provides a server list, while Config provides rules and other settings. A successful subscription update doesn't mean the active Config was replaced or that a remote configuration was enabled. Check separately whether a file is listed and whether it's active.
The official screenshot shows the General, Rule, Hosts, URL Rewrite, and HTTPS Decryption sections in the Config editor. For a first connection, focus on Rule; you don't need to edit every other section. Viewing a file doesn't automatically make it the active one. After editing, return to the list to confirm the changes were saved and check the active status.
Rules in Rule are generally matched from top to bottom, and the first match determines the policy. If no earlier rule matches, FINAL is the fallback. PROXY, DIRECT, and REJECT are policy keywords; they aren't the same settings as Proxy and Direct in Global Routing. The former are rule outcomes, while the latter are overall modes. Distinguish them by their capitalization and where they appear in the interface or configuration.
Return to Home after choosing a mode. To understand how the three modes work with rules, see Proxy Mode Guide. To identify a keyword, the glossary is enough; you don't need to explore every configuration detail before your first connection.
03 / Home · VPN
Start the Connection and Approve the VPN Prompt
Before connecting, check the server, mode, and your device's regular network in that order. Then respond to the system's VPN configuration prompt.
Start a Connection in Home
Return to Home. Check the selected entry in the SERVER group, then confirm Global Routing is still set to the mode you chose. Make sure your Wi-Fi or cellular connection works, then turn on the connection switch at the top of the screen. Not Connected in the official screenshot is an example of the disconnected state. In actual use, watch for the switch and status text to change; don't treat the screenshot as proof of a successful connection.
The first time you connect, the system may ask permission to add a VPN configuration. Read the prompt, confirm that you initiated the action in Shadowrocket, then continue and authenticate as required by your device. This lets the app handle connections through the system network extension. It doesn't create server details or replace the subscription import described above.
After confirming in the system prompt, return to Home and wait for the status to settle. If you previously canceled the prompt, the switch may turn off again. You can start the connection again and respond to the prompt. If device management prevents adding a VPN configuration, check the device restrictions rather than assuming the server details are wrong.
Keep Settings Unchanged After Connecting
An enabled switch and a connected status show that the local connection process has reached a certain stage; they don't prove that the selected server can access every destination. Keep the server and Global Routing unchanged and run the tests in the next section. Don't switch among several entries as soon as the status changes, or it will be hard to match later results to the same conditions.
If another VPN configuration is already active on your device, check which one is currently in use. If needed, stop the other connection before testing. During your first manual test, check whether On Demand might restart a connection based on existing conditions. Note the original settings before making temporary changes, and restore them afterward.
The steps are the same on iPad and iPhone, though some screens may be wider. On either device, follow the Home, Global Routing, and system authorization prompts you actually see. To end the test, return to Home, turn off the connection switch, and confirm that the status changes.
04 / Connectivity Test
Verify the Connection and Routing Rules
Check test results, destination access, and routing behavior separately; don't rely on a single status.
Test the Server, Then the Destination
Run Connectivity Test in Home and review the result for the selected entry. If you're unsure what the test checks, first review Test Method in Settings. Different methods may test different targets and routes, so a result doesn't prove that every website, app, or UDP connection will work. Likewise, consider actual access before drawing conclusions from a single timeout.
Next, open the website or app you need and perform a simple, repeatable action, such as reopening the same page. Use a fresh request if possible, so cached content isn't mistaken for a successful connection. Note the network, server, and mode used during the test. If an issue occurs later, you can reproduce the same conditions instead of relying on memory.
Check the Policy Under Config
With Config selected, successful access alone isn't enough; check whether the expected policy was used. Review the available connection records, find the domain or address for the destination you just accessed, and check the matched rule and policy. If a connection expected to use the proxy shows DIRECT, first check the rule order, active Config, and FINAL rather than immediately changing server authentication details.
If a broad rule appears earlier in the list, more specific rules below it may never be matched. For long-lived connections, you may also need to send a new request after changing a rule to see the effect. Confirm that the record is for a new request before deciding whether the change worked. Don't draw conclusions just because an old page remains open.
Get a Reproducible Result
- Confirm the Home switch and status look right, and that the selected server hasn't changed.
- Interpret Connectivity Test in light of Test Method; don't compare a single number in isolation.
- Access the actual destination. With Config selected, also check the request's policy and matched rule.
Once all three checks are complete, you have a basic connection that can be reviewed. Traffic changes in Data can offer clues, but background requests also generate traffic, so an increase in usage doesn't verify access to a specific destination. If only one app fails while other destinations work, focus on that destination's rules and connection records first.
If you temporarily used Proxy for testing, you can now switch back to Config if that's the mode you need, send a new request to the same destination, and check it again. Your everyday settings are verified only if the request also behaves as expected after switching back. For more on rules, see the protocol guide and glossary. Next, troubleshoot any step that still fails.
05 / Settings · Diagnostics
Troubleshoot by Failure Point
Start with the first step that failed and change one condition at a time. Note what happened before adjusting settings.
Import Is Empty or the Connection Fails Immediately
If the subscription import is empty, return to step one: check the link and update result, make sure your device's regular network works, and confirm the subscription status with your service provider. If the server list appears but the connection fails, check Type, Host, Port, and authentication fields one by one. If you use a domain name, check for DNS resolution errors in the logs. A successful import and a working server are two separate things; troubleshoot them separately.
If the switch won't stay on, first check whether system VPN permission was granted, whether the device has restrictions, or whether another connection configuration is interfering. If the local connection status is normal but both Connectivity Test and actual access fail, check the server details and network conditions. Disconnect to confirm the regular network works, then reconnect and test again to help determine whether the problem is limited to the proxy route.
Test Passes but the Destination Still Won't Load
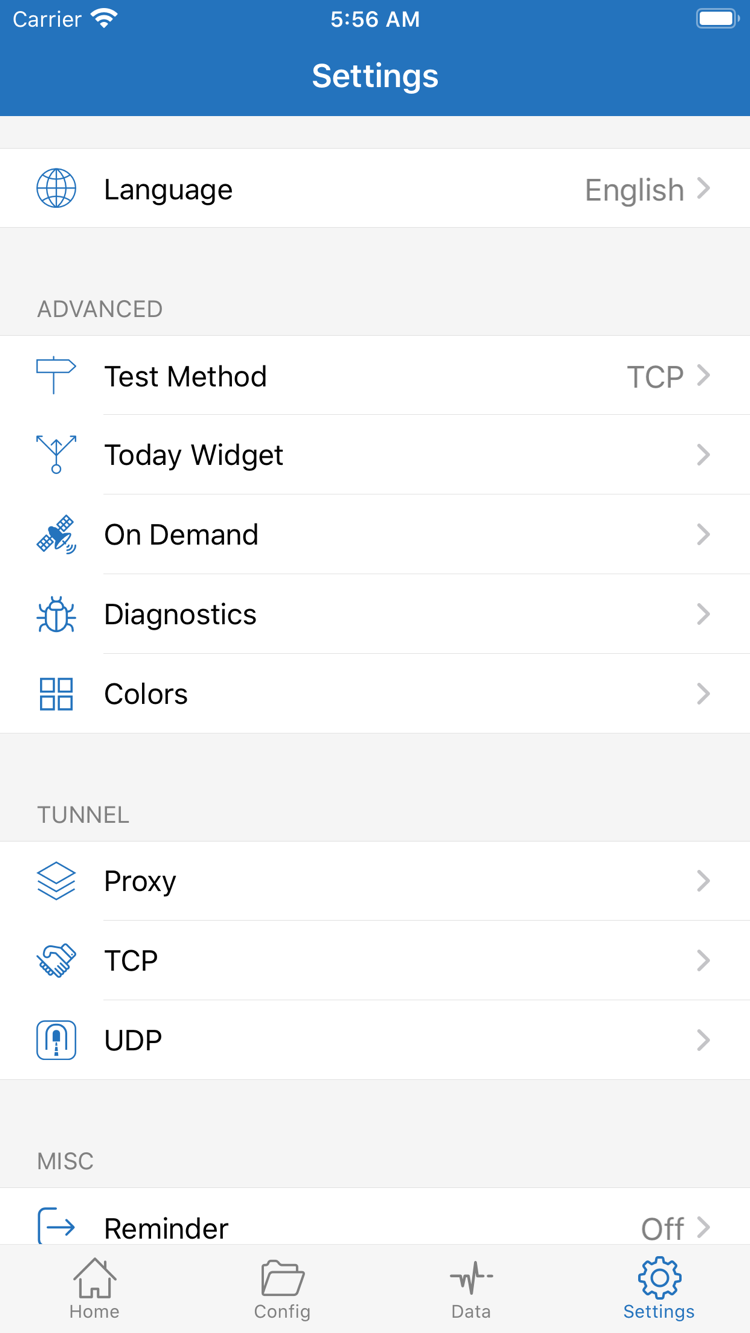
Check Test Method in Settings to understand what the result actually indicates. The test method may not cover the transport used by your destination. A webpage failing to load, an app failing to sign in, and a feature not working may involve different requests. Keep one destination and server fixed for comparison. Don't change multiple settings such as TCP and UDP just to get a particular test result.
After noting the original mode, briefly compare Proxy and Config using the same destination. If it works in Proxy but not in Config, first check the active Config, matched rule, and policy. If it fails in both modes, check the server details, server status, and current network. Restore the mode you need after testing. A result in Direct doesn't verify the proxy route.
Check On Demand and Diagnostics
On Demand in Settings may start a connection when existing conditions are met. If the connection returns after you manually turn it off, first check whether On Demand has a matching condition before treating this as an error. For initial troubleshooting, note and temporarily disable relevant conditions so you can observe the manual switch more clearly. Restore them afterward if needed; don't leave a temporary test setting in place indefinitely.
For more information, open Diagnostics and note where the problem occurs along with any available diagnostic details. A useful report should say whether the import succeeded, whether the switch is on, which Global Routing mode is selected, which destinations fail, and whether the issue recurs on another network—not just that it won't connect. Note the time and reproduce the issue once to help find the relevant request in the logs.
If the cause is still unclear, continue with troubleshooting based on what happened. If you're unsure what a field means, check the glossary. This completes the basic first-connection workflow: details added in Home, a confirmed mode, system authorization granted, an actual request verified, and the failure point identified if something went wrong.
Further Reading
Continue with the Relevant Guide
After establishing a basic connection, keep a restorable copy of Config and adjust everyday settings one at a time.